How to AdjustAloe VeraWatering for Low Humidity: A Plant Parent's 2-Week Experiment
I love myAloe Veraplants. Their sculptural, soothing presence is a staple in my home. But last winter, when the heating system kicked in and sucked all the moisture from the air, I noticed something worrying. My usually plump, vibrantAloe Verastarted looking a bit… deflated. The tips of some leaves were browning, and the rich green color seemed to fade toward a yellowish tinge. I was following my usual watering routine, but clearly, it wasn't working. That's when I realized I needed to learn how to adjust aloe vera watering for low humidity conditions. This isn't just about watering less; it's about understanding how dry air changes everything for these succulent plants. I decided to turn my concern into a focused, two-week experiment on my largest Aloe barbadensis miller, documenting every step, mistake, and triumph.
Understanding the "Why": How Low Humidity Tricks Us

Before changing my routine, I had to understand the enemy: dry air. In normal humidity, aloe vera loses a small amount of moisture through its leaves (transpiration). In low humidity, this process accelerates dramatically. The soil mightlookdry on top faster, but here’s the trap—the plant’s roots and water-storing leaves aren't necessarily using water up any quicker. In fact, the plant may enter a more dormant state to conserve resources. The American Horticultural Society'sPlant Adaptationguide notes that many succulents, including aloe, slow their growth and metabolic activity in response to environmental stress like dry air. So, while the surface conditions scream "thirsty," the plant's core system is whispering, "I'm okay for now." Watering based on that dry surface cue alone is the fastest path to root rot.
My Step-by-Step Adjustment Plan
I cleared a two-week calendar block and committed to a new, observation-based protocol. My core long-tail keyword focus became "aloe vera watering schedule dry climate" and "signs of overwatered aloe in low humidity."
Week 1: The Reset and Deep Observation
Day 1-3: The Dry-Out and Baseline.I started by not watering at all. My goal was to let the pot dry out completely so I could establish a true baseline. I used a simple wooden chopstick, inserting it deep into the soil near the root zone. I left it for an hour. When pulled out, it was still slightly damp and cool about two-thirds of the way down. This confirmed my suspicion: the top was bone dry, but moisture lingered below. I also gently squeezed a lower, mature leaf. It was firm but not as rigid as I’d like—a sign it had begun using its internal water stores.
Day 4: The First Adjusted Watering.The chopstick came out completely dry and warm. The lower leaf felt slightly less firm. This was my cue. Instead of my old habit of drenching the pot, I practiced what I now call "targeted hydration." I used a long-spouted watering can to slowly apply wateronlyto the soil, avoiding the leaves and the center rosette (which can trap water and cause rot). I watered until I saw just a slight trickle from the drainage holes—a thorough soak but not a flood. I immediately emptied the saucer underneath. The Royal Horticultural Society (RHS) emphasizes this drainage step as non-negotiable for potted succulents, especially in stagnant, dry air where evaporation is slower from the soil surface.
Day 5-7: Vigilant Monitoring.I placed a basic digital hygrometer near the plant. The humidity hovered between 25-30%—definitely low. I resisted all watering urges. I felt the leaves daily, noting a gradual return to firmness. I checked the soil daily with the chopstick. By Day 7, the top inch was dry again, but the chopstick indicated deeper moisture.
The First Major "Aha!" Moment and a Big Mistake
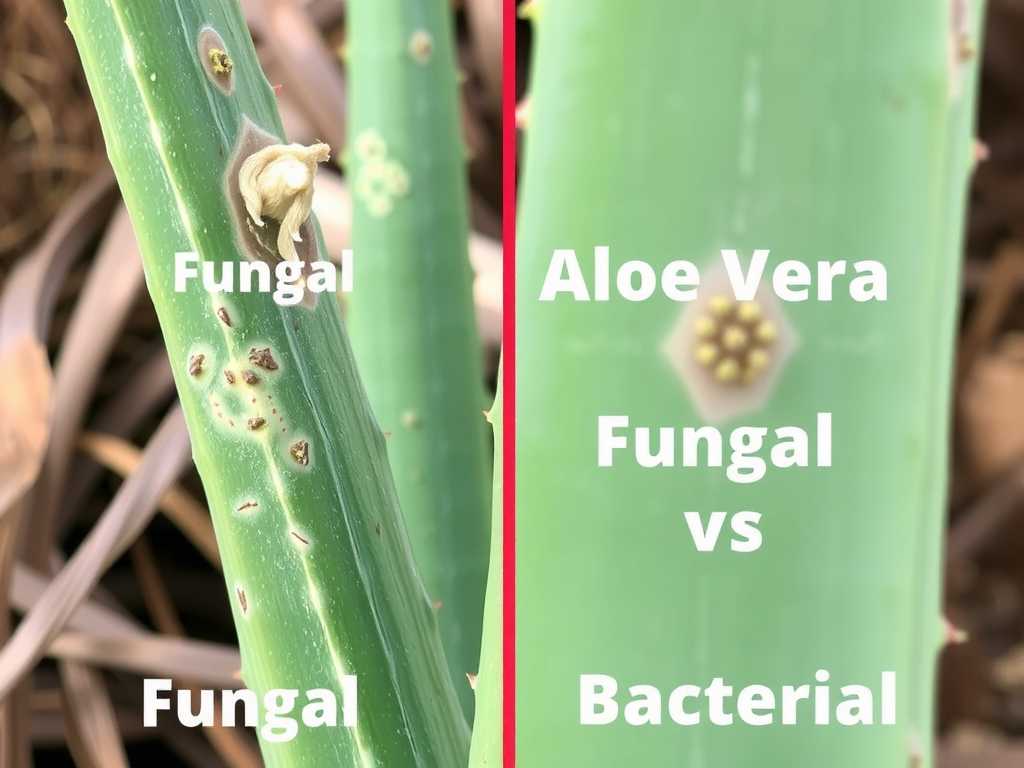
Around Day 5, I noticed a small, soft, dark spot on one outer leaf. Panic set in. Was it rot? I had been so careful! Upon closer inspection, I realized my mistake. In my initial worry before the experiment, I had lightly misted the plant, thinking it would help with the dry air. This water had settled in the leaf axil and, without good airflow, had begun to cause localized rot.The fix:I stopped misting immediately. Using a sterilized knife, I carefully excised the soft spot, cutting back to firm, healthy tissue. I left the wound to callus over in the dry air. This was a critical lesson:Misting aloe vera in low humidity is generally ineffective and often harmful.It doesn't raise ambient humidity and can invite fungal issues. The solution must come from the roots.
Week 2: Refining the Rhythm and Seeing Results
Day 8-10: Assessing the Cycle.The plant's color was improving. The yellowish tinge was receding, returning to a grayer, healthier green (aloe in bright light often has a grayish hue, which is normal). The firmness was excellent. My chopstick test on Day 10 showed the pot was nearly, but not completely, dry deep down. I decided to wait.
Day 11: The Second Watering.The chopstick was fully dry. I repeated the targeted, soil-only soak. The plant was now clearly in a "feast or famine" cycle suited to its needs: a deep drink followed by a complete dry period. This mimics the natural rainfall patterns in its native habitat.
Day 12-14: Documenting the Transformation.By the end of the two weeks, the change was undeniable. The leaves were uniformly firm and turgid. The browning tips had stopped progressing. The plant had a perkier, more upright posture. Most importantly, there wereno new signs of distress.I had successfully broken the cycle of reacting to surface dryness and was now responding to the plant's actual hydration needs.
Key Takeaways and Your Actionable Checklist
My experiment solidified a new routine. Here’s your blueprint to adjust aloe vera watering in low humidity:
- Ditch the Calendar:Never water on a schedule. Your cue is the soil, not the day of the week.
- Invest in Tools:A moisture meter or the simple "chopstick test" is worth more than gold. Check moisture at root level, not the surface.
- Water Deeply, But Infrequently:When you water, do so thoroughly until water drains, thenempty the saucer.Then, wait. The "dry period" is crucial for root health.
- Avoid Leaf Watering:Water the soil directly. Keep the rosette dry to prevent rot.
- Consider Pot and Soil:I didn't change mine for this experiment, but terracotta pots and a gritty, well-draining cactus/succulent mix are your best allies in low humidity, as they promote evaporation and aeration.
Addressing Your Lingering Questions
Can I just use a humidifier for my aloe vera?You can, but it's often unnecessary. Aloe vera tolerates low humidity very well once its watering is corrected. A humidifier is more beneficial for humidity-loving plants like ferns or calatheas. Focus on getting the watering right first; that's 95% of the battle.
How do I know if it's underwatering vs. overwatering? Both can cause brown tips.This is tricky. Overwatering in dry air often leads tosoft, mushy brown spotsor yellowing,translucentleaves that may feel soggy. Underwatering causes leaves to becomethin, curled, and dry with crispy brown tips.The leaf will feel limp and papery, not mushy. When in doubt, check the soil and err on the side of underwatering.
Should I fertilize when adjusting my watering routine?No. During a period of adjustment and especially in low-humidity stress, fertilizing can do more harm than good. It can force growth when the plant is focused on conservation and can burn sensitive roots. Wait until you see active, new growth (typically in spring or summer) before resuming a diluted feeding schedule.
Learning how to adjust aloe vera watering for low humidity transformed my plant care approach from reactive to proactive. It taught me to read my plant's language—the firmness of its leaves, the color of its skin, the true moisture content of its soil. That large aloe is now thriving, not just surviving, through the dry seasons. It’s a resilient plant, and by trusting its natural rhythms and adapting our care to the environment, we can both flourish.


发表评论