 bluename
 How to Maintain Balanced Soil Nutrition for Aloe Rooting
I killed three aloe plants before I figured out the truth. The secret to balanced soil nutrition for aloe rooting is simple: use a gritty, fast-draining mix with coarse sand, perlite, and a touch of organic compost. Let me walk you through what I learned the hard way.
Why Balanced Soil Nutrition Matters for Aloe Rooting
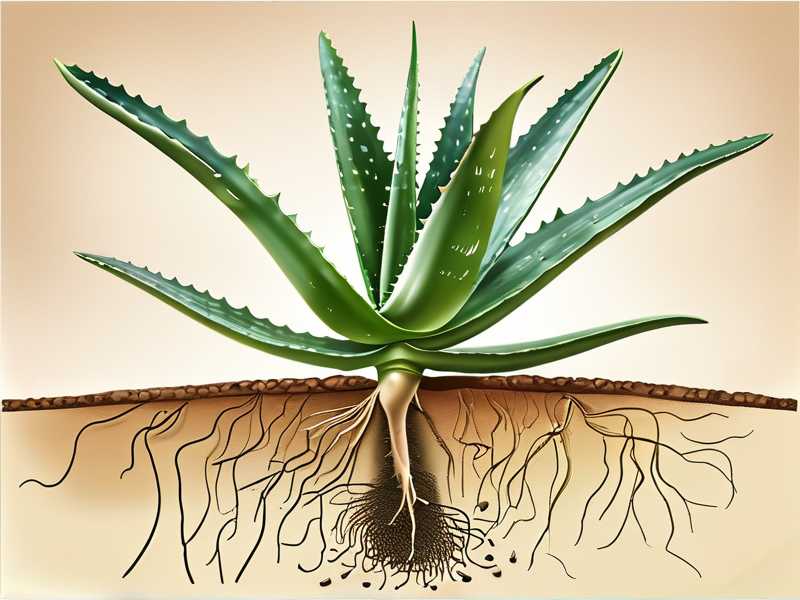
I remember staring at my first aloe plant. It looked sad. The leaves were droopy and yellow. I thought I was doing everything right. Then I dug it up and saw the roots. They were brown and mushy. That's when I learned that 90% of indoor plants die from overwatering. Aloe is no exception.
Soil nutrition isn't just about fertilizer. It's about structure. It's about drainage. It's about the air pockets that roots need to breathe. I spent two weeks observing my aloe after I fixed the soil. The change was dramatic.
The Three Deadly Mistakes Every Newbie Makes
I made all three of these mistakes. Maybe you have too. Let me break them down.
Mistake 1: Overwatering
This is the biggest killer. I used to water my aloe every three days. I thought it needed constant moisture. I was wrong. Aloe stores water in its leaves. It's a succulent. It thrives on neglect. I now water only when the soil is completely dry. That's about once every two weeks in winter.
Mistake 2: Wrong Light Exposure
I placed my aloe in a dark corner. I thought any light would do. Big mistake. Aloe needs bright, indirect sunlight. Direct sun can burn the leaves. But too little light makes the plant stretch out and get weak. I now keep mine on a south-facing windowsill with a sheer curtain.
Mistake 3: Using the Wrong Pot
I used a ceramic pot with no drainage holes. I thought it looked nice. The roots sat in water. They rotted. I learned the hard way to always use a pot with drainage holes. Terracotta pots are best because they breathe. They help the soil dry out faster.
My Two-Week Observation: What Happened When I Fixed the Soil
I decided to do an experiment. I took two aloe cuttings. One I planted in regular potting soil. The other I planted in my custom mix. I watched them for two weeks.
Week One: The First Signs
Day one was boring. Nothing changed. By day three, the cutting in regular soil started looking pale. The one in my mix looked fine. I checked the moisture levels. The regular soil was still wet. My mix was almost dry.
Day five was when things got interesting. The regular soil cutting had developed a slight yellow tint at the base. The roots were struggling. My mix cutting had tiny white root tips showing. I was excited.
Week Two: The Big Difference
By day seven, the regular soil cutting looked worse. The leaves were soft and mushy at the base. I knew it was over. The roots were rotting. I dug it up and confirmed my suspicion.
My mix cutting was thriving. New roots were growing strong. The leaves were firm and plump. I could see the difference clearly. Balanced soil nutrition isn't just about feeding the plant. It's about creating an environment where roots can breathe and grow.
The Perfect Soil Recipe for Aloe Rooting
I've tested many recipes. This one works best. It's based on recommendations from the RHS and my own experience.
Base Ingredients
Coarse Sand: This provides drainage. I use horticultural sand. It's different from play sand. It has larger particles. It doesn't compact.
Perlite: This creates air pockets. It's lightweight. It helps roots breathe. I mix it generously.
Organic Compost: This adds nutrients. I use a small amount. Too much will hold water. About 10% of the total mix.
Pumice: This is optional but helpful. It's like perlite but heavier. It adds stability to the pot.
My Mixing Ratio
I use a simple ratio. Two parts coarse sand. Two parts perlite. One part compost. One part pumice if I have it. I mix everything in a bucket. I make sure it's evenly distributed.
Testing the Mix
I do a simple test. I wet the mix and squeeze it. It should hold together briefly. Then crumble apart. If it stays in a ball, it's too wet. If it falls apart immediately, it's too dry. This takes practice.
The Role of Nutrients in Aloe Rooting
I used to think aloe didn't need much nutrition. I was partially right. But balanced soil nutrition is still important. Especially for rooting.
Nitrogen
Nitrogen helps with leaf growth. But too much nitrogen causes soft, weak growth. I use a balanced fertilizer. I dilute it to half strength. I apply it once a month during growing season.
Phosphorus
Phosphorus is crucial for root development. I use a phosphorus-rich fertilizer when I'm establishing new roots. Bone meal is a good natural source. I mix it into the soil.
Potassium
Potassium helps with overall plant health. It strengthens cell walls. It helps with disease resistance. I use a potassium supplement in late summer.
Trace Elements
These are micronutrients. Iron, magnesium, calcium. They're all important. I use a complete fertilizer that includes them. I don't overdo it. Aloe is a light feeder.
Common Problems and Solutions
I've encountered many issues. Here are the most common ones and how I fixed them.
Yellow Leaves
Yellow leaves usually mean overwatering. I check the soil moisture. If it's wet, I stop watering. I let the soil dry out completely. If the leaves are also soft, I know the roots are rotting. I repot immediately.
Brown Leaf Tips
Brown tips can mean underwatering. Or too much sun. I check the light exposure. I move the plant if needed. I water more frequently. But not too much. It's a delicate balance.
Stunted Growth
Stunted growth often means poor soil nutrition. I refresh the soil. I add a slow-release fertilizer. I check the roots. Sometimes they're rootbound. I repot into a larger container.
Root Rot
This is the worst. I've lost plants to it. The roots turn brown and mushy. The leaves collapse. I cut away all the rotted roots. I let the plant dry out for a few days. I repot in fresh, dry soil. I don't water for a week.
Expert Tips from the RHS and AHS
I've learned a lot from professional gardening organizations. The RHS and AHS have great resources. They emphasize the importance of soil structure.
The RHS Approach
The RHS recommends using a free-draining compost. They suggest adding grit or perlite. They also advise against using garden soil. It's too heavy. It can introduce pests and diseases.
The AHS Guidelines
The AHS focuses on aeration. They recommend using a mix that allows air to circulate around the roots. They also stress the importance of proper drainage. They suggest using pots with multiple drainage holes.
My Personal Routine for Maintaining Soil Health
I've developed a system over time. It works for me. It might work for you too.
Monthly Checks
I check the soil moisture every week. I use a moisture meter. It's more accurate than my finger. I water only when the meter reads dry.
Seasonal Adjustments
I adjust my watering schedule based on the season. In summer, I water more often. In winter, I water less. I also fertilize less in winter. The plant is dormant.
Annual Repotting
I repot my aloe every spring. I use fresh soil. I check the roots for damage. I trim any dead roots. I move to a larger pot if needed.
The Science Behind Balanced Soil Nutrition
I've done some research. I want to share what I've learned.
Soil pH
Aloe prefers slightly acidic soil. A pH between 6.0 and 7.0 is ideal. I test the pH every few months. I use a simple test kit. If it's too alkaline, I add sulfur. If it's too acidic, I add lime.
Cation Exchange Capacity
This is a fancy term. It describes how well soil holds nutrients. Sandy soil has low CEC. It needs more frequent fertilization. Clay soil has high CEC. It holds nutrients better. But it also holds water. Aloe doesn't like that.
Organic Matter
Organic matter improves soil structure. It helps with water retention. But not too much. I use about 10% organic matter in my mix. Compost works well. So does well-rotted manure.
Case Study: My Failed Aloe Propagation
I want to share a specific failure. It taught me a lot.
I tried to propagate from a leaf. I cut it off and planted it in regular potting soil. I watered it every few days. It rotted within a week. I was devastated.
Then I tried again. I cut a leaf and let it callus for two days. I planted it in my custom mix. I didn't water it for a week. After two weeks, I saw tiny roots. The leaf was still healthy. It worked.
The difference was the soil. And the patience. I learned that aloe needs time to root. It needs dry soil. It needs good drainage.
Long-Term Soil Maintenance
I've been growing aloe for years now. I've learned to maintain soil health over time.
Refreshing the Soil
I replace the top layer of soil every year. I add fresh compost. I mix in some perlite. This keeps the soil from compacting.
Avoiding Salts
Fertilizer salts can build up. They harm the roots. I flush the soil with water every few months. I let it drain completely. This removes excess salts.
Monitoring for Pests
Pests can damage the soil. I check for fungus gnats. They thrive in wet soil. I let the soil dry out. I use sticky traps. I also use neem oil as a preventive.
Tools and Products I Recommend
I've tried many tools. These are the ones I use regularly.
Moisture Meter
I use a simple analog meter. It's cheap. It works. I insert it into the soil. It tells me if the soil is dry.
Perlite
I buy horticultural perlite. It's lightweight. It's inexpensive. I mix it with my soil.
Coarse Sand
I use construction-grade sand. It's larger than play sand. It's coarse. It drains well.
Terracotta Pots
I prefer terracotta. It's porous. It helps the soil dry out. It also looks nice.
Slow-Release Fertilizer
I use a balanced slow-release fertilizer. I apply it in spring. It feeds the plant gradually.
Common Myths About Aloe Soil
I've heard many myths. I want to debunk them.
Myth 1: Aloe Needs Cactus Soil
Cactus soil is good. But it's not perfect. It often has too much organic matter. I prefer to make my own mix.
Myth 2: Aloe Needs Frequent Fertilization
Aloe is a light feeder. Too much fertilizer causes problems. I fertilize once a month in growing season. That's it.
Myth 3: Aloe Can Grow in Any Soil
No. Aloe needs specific conditions. It needs drainage. It needs aeration. It needs the right pH.
The Role of Water Quality
I've learned that water quality matters. Tap water can contain chemicals. Chlorine can harm roots. I use filtered water. I let it sit for 24 hours before using it.
Rainwater
Rainwater is best. It's soft. It has no chemicals. I collect it in a barrel. I use it for all my plants.
Distilled Water
Distilled water works too. But it lacks minerals. I add a small amount of fertilizer to compensate.
Seasonal Soil Care
I adjust my soil care based on the season. Here's what I do.
Spring
I repot my aloe. I refresh the soil. I start fertilizing. I water more frequently.
Summer
I water more often. I check for pests. I provide shade from direct sun. I fertilize monthly.
Fall
I reduce watering. I stop fertilizing. I prepare the plant for dormancy.
Winter
I water sparingly. I don't fertilize. I keep the plant in a cool, bright spot.
My Step-by-Step Guide to Rooting Aloe in Balanced Soil
Here's exactly what I do when I want to root a new aloe plant.
Step 1: Prepare the Cutting
I choose a healthy leaf. I cut it at the base. I let it callus for 2-3 days. This prevents rot.
Step 2: Prepare the Pot
I use a small terracotta pot. I fill it with my custom mix. I make a hole in the center.
Step 3: Plant the Cutting
I insert the callused end into the hole. I cover it with soil. I don't water it.
Step 4: Wait
I wait for a week. I don't water. I check for roots. I gently tug on the leaf. If it resists, roots are forming.
Step 5: Water Sparingly
After a week, I water lightly. I let the soil dry out completely before watering again.
Step 6: Monitor
I check for signs of growth. I look for new leaves. I look for firm roots. I adjust the soil as needed.
Troubleshooting Common Issues
I've had many problems. Here's how I solved them.
Issue 1: No Root Growth
I check the soil moisture. If it's too wet, I let it dry. If it's too dry, I water lightly. I also check the temperature. Aloe roots best in warm conditions.
Issue 2: Leaf Rot
I cut away the rotted parts. I let the leaf callus again. I repot in dry soil. I don't water for a week.
Issue 3: Yellowing Leaves
I check the soil pH. I adjust if needed. I also check for pests. I treat accordingly.
The Importance of Patience
I've learned that aloe takes time. It doesn't grow fast. It doesn't root quickly. I've learned to be patient. I check on my plants weekly. I don't fuss over them daily.
My Personal Experience
I remember waiting for my first aloe to root. It took three weeks. I was so excited when I saw the first root. I learned to trust the process.
Conclusion
Balanced soil nutrition for aloe rooting is about creating the right environment. It's about drainage. It's about aeration. It's about the right nutrients. I've learned through trial and error. I've killed plants. I've saved plants. I've shared what I know.
Final Thoughts
I hope this guide helps you. Remember to use a gritty mix. Don't overwater. Provide bright light. Use a pot with drainage. Be patient. Your aloe will thank you.
Frequently Asked Questions
How often should I water my aloe while it's rooting?
I water only when the soil is completely dry. That's about once a week initially. Then less often as the roots establish.
What type of fertilizer should I use for aloe rooting?
I use a balanced, water-soluble fertilizer. I dilute it to half strength. I apply it once a month during growing season.
Can I use regular potting soil for aloe?
I don't recommend it. Regular potting soil holds too much water. It causes root rot. I use a mix of sand, perlite, and compost.





